Single Sign-On
TrackJS supports Single Sign-On (SSO) via SAML 2.0. We support both “Service Provider” (SP) initiated and “Identity Provider” (IdP) initated login flows. There are no additional fees required to configure and begin using our SSO functionality.
Configuring SSO
Please follow the steps below to configure TrackJS and your identity provider.
1. Obtain an Organization ID
To begin the SSO configuration process, please email us at hello@trackjs.com. We will enable SSO for your account and provide you with an Organization ID. This is a unique key in our system which will identify your SAML assertion requests and also allow your users to login via our Single Sign-On login UI (if you’re using SP-initiated flows).
2. Visit TrackJS SSO Account Settings
Once you have received your Organization ID from us, you can navigate to your Account Settings page and look for the Single Sign On section:
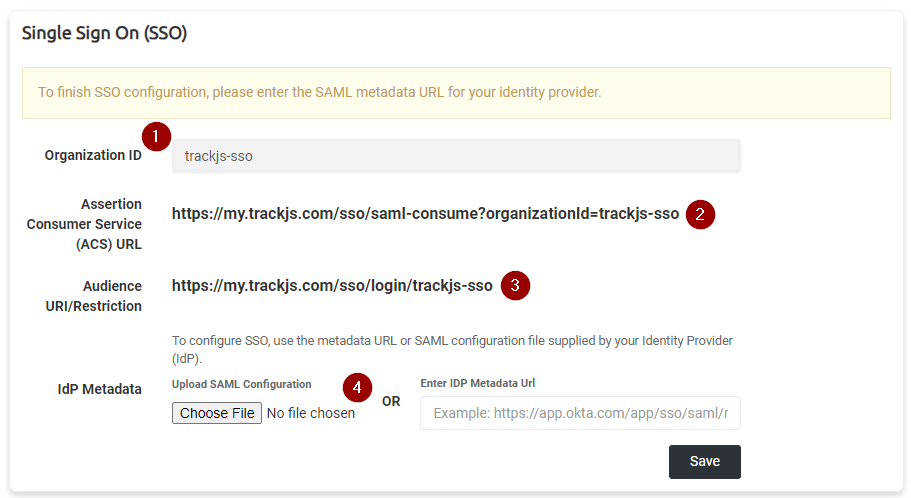
There are several fields which may be important depending on your use case and identity provider.
- Your organization ID is displayed in a read-only textbox. This is necessary if you want to use SP-initiated login flows (more below).
- The Assertion Consumer Service URL (sometimes abbreviated ACS or called a SAML consumer service URL). This will be required by your identity provider. SAML assertions are sent to this URL, and it’s important that your organization ID is on the query string.
- The Audience URI value is sometimes required by identity providers to further restrict access, but it’s also the SP-initated login flow URL. Important: Some identity providers call this the Entity ID value instead.
- The IdP metadata section allows you to upload the metadata XML file from your provider, or paste the public metadata URL to finalize SSO configuration.
3. Create the TrackJS Application in Your Identity Provider
The steps to configure your identity provider will vary, but in the most general case you’ll usually create an “application” within your identity provider called TrackJS. You can add and remove users from this application to control access to TrackJS. While the specifics will depend on the provider, there are a few common things that should be noted:
- Ensure you are using SAML 2.0 for the application
- Use email address as the username identifier, not an opaque ID or Active Directory username
- You will need to paste the TrackJS Assertion Consumer Service URL (#2 in the screenshot above) somewhere in your identity provider.
- Once configured in the identity provider, you will need to find the SAML configuration metadata XML file or metadata URL for your application. (We support configuration via either option)
4. Finish SSO Configuration
Once you’ve configured your identity provider, the last step is to upload the metadata XML file, or paste the metadata URL, from your identity provider in to the TrackJS account settings page and click Save. We will automatically retrieve the redirect URI and X509 certificate from the metadata endpoint and save it for your account.
Your account settings will now look like this:
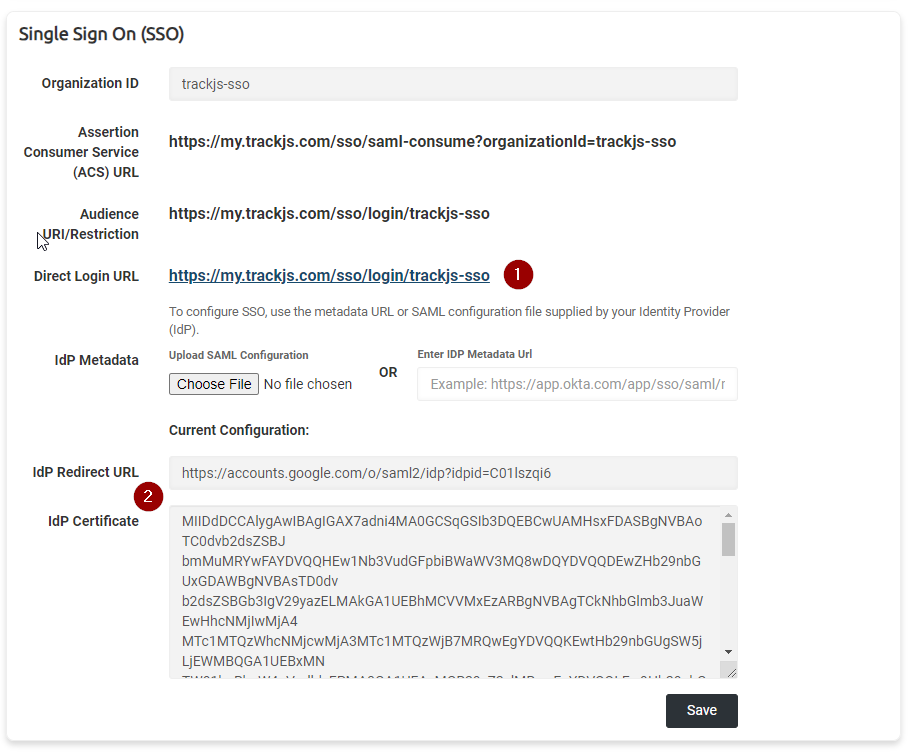
There are several changes you may notice.
- There is now a URL you can share with your team for direct SP-initiated logins.
- We will automatically process the identity provider’s redirect URL and security certificate from the metadata XML file or URL. These are displayed in read-only text boxes but are useful for debugging purposes. (Note that you can update this configuration by uploading another metadata file or entering a different metadata URL)
Converting Existing Users
The final step is to convert any existing TrackJS user(s) to have access controlled via your identity provider. Once your configuration is complete we will convert an existing account for testing. After you’ve confirmed the integration is working, we will convert any other existing users. This is a process that must be done on the back-end currently, so please email us at hello@trackjs.com and we will take care of it.
New Users Are Automatically Provisioned
Once you’ve configured SSO, you do not need to invite new users to TrackJS. You can simply add them to the TrackJS application in your identity provider and they will be automatically provisioned the first time they login. Only previously existing users with access controlled via password need to be manually converted.
Identity Provider vs. Service Provider Initiated Login
Most identity providers have some way to log you in directly to TrackJS from the identity provider’s site. This is accomplished by sending a SAML assertion directly to TrackJS. This is commonly called IdP-initiated login. We fully support this and generally recommend it if it’s available.
If your identity provider does not support this mechanism or you’d prefer to use our UI to route the authentication attempt to your identity, you can login directly through our UI with your Organization ID. There is a link to the SSO login screen on the TrackJS homepage, but you can also directly access it here.
Currently Supported Identity Providers
- Okta
- OneLogin
- Azure AD
- Auth0
- Many others
FAQ
My Identity Provider wants an Entity ID, where can I find it?
Google and some other providers use slightly different terminology. The Entity ID is the same thing as the Audience Restriction URI.
Are new users automatically provisioned?
Yes! If a user attempts to authenticate with your identity provider and is successful, we will automatically provision a new user account for them. By default they will not receive administrator/owner privileges. If that is desired a current administrator will have to elevate their permissions.
I have multiple TrackJS accounts, can they all be controlled with the same SSO configuration?
Yep! Just let us know when you begin the SSO setup process and we can get it sorted for you.
The vast majority of authentication solutions that support SAML 2.0 will work with TrackJS. If you have specific questions about it please reach out to us!